
 USD
USD  USD
USD  GBP
GBP  EUR
EUR  INR
INR  ZAR
ZAR  AUD
AUD  CAD
CAD  MYR
MYR  SGD
SGD  THB
THB  HKD
HKD  BRL
BRL  AED
AED 
This blog specifies instructions for creating an encryption key pair, Certificate Signing Request (CSR) file and installing SSL certificate for Oracle WebLogic Server 12c (Any version supported). Make sure WebLogic Server must be installed and Running.
Weblogic Server is a very popular and widely used Java Enterprise Edition application server (AKA Java EE) developed by BEA System and now wholly acquired by Oracle Corporation since 2008. Weblogic Server used to deploy server oriented web applications in a very highly secured and scalable environment. Weblogic Server came into existence because of the booming e-commerce industry. As you know, the E-commerce industry needs a robust and reliable source of data transmission thus to attain this need Oracle Weblogic server required. It also manages system-level details and works on Java 2 Platform, Enterprise Edition (J2EE) technologies.
Generate CSR and Install SSL Certificate on WebLogic Server
To Generate CSR & Install SSL Certificate on WebLogic Server, Perform the following steps:
Step 1: Create Java KeyStore (JKS) and Generate Private Key with Java keytool utility
Type a following command to Generate a Key Store:
keytool -genkey -alias server -keyalg RSA -keystore your_domain.jks
Make sure you replace your_domain with the actual domain name for example, mydomain.com to secure. If you are looking to secure a Wildcard certificate, do not include an asterisk (*) in the file name. The reason is because character is not supported.
Note:
i) Alias name will be used when you import the CA-signed certificate in KeyStore.
ii) KeyStore used to specify a location of a JKS file, if no JKS file present in the path given, a new KeyStorewill be created.
Step 2: Create Certificate Signing Request (CSR) for Key [alias_name] generated in the previous step
Next step, Generate a Certificate Signing Request (CSR) for WebLogic Server. Now, You will be prompted to enter following attributes of the certificate and keystore upon execution of the previous command:
Enter keystore password: [Enter a password to protect the keystore]
Re-enter new password: [Confirm the password used to access the key in keystore]
What is your first and last name? [Type your Domain name to which certificate key is created, for instance; www.example.com ]
What is the name of your organizational unit? [for instance, IT]
What is the name of your organization? [for instance, XYZ Corporation]
What is the name of your City or Locality? [for instance, Los Angeles]
What is the name of your State or Province? [for instance, California ]
What is the two-letter country code for this unit? [for instance,  US]
Is CN=example.com, OU=IT, O=XYZ Corporation, L=Los Angeles, ST=California, C=US correct?
If all information is correct, then enter ‘YES‘
Now, Enter the following command under bin folder of the JRE:
keytool -certreq -alias server -keyalg RSA -file your_domain.csr -keystore your_domain.jks
Upon execution of a command, a CSR file will be generated including the server’s public key that you need to send to Certificate Authority (CA) to obtain a trusted SSL certificate.
Step 3: Extract your SSL certificate files
Certificate Authority (CA) validates your domain name and issues an SSL certificate in .zip file based on your submitted CSR [certificate_request].csr and sends it on your email. You will receive an SSL certificate including Root, Intermediate and Primary Server certificate files. Just You need to extract issued certificate files and open using text editor (the recommended editor is Notepad). Next, you need to merge all files and convert them into [mycertificate].pem format using a text editor.
Make sure you follow this order to create a single PEM files:
- Add Primary Server Certificate
- Add Intermediate Certificate
- And Add Root Certificate
Step 4: Install your SSL certificate
To import the myCertificate.pem file that you have created earlier you will need java key-tool command line utility. With the help of this utility type the following command in a single line. See below:
keytool -import -alias [alias_name] -file [myCertificate].pem -keystore /path_to_keystore[your_domain].jks
The above-mentioned code will import the file (myCertificate.pem) into your Keystore (for instance, [your_domain].jks).
Step 5: Configure Identity and Trust Stores and SSL for Weblogic Server Console
Follow steps as mentioned below:
- Log into the “Oracle WebLogic Server Admin Console”
- Expand ‘Environment > Servers‘ node under Domain Structure
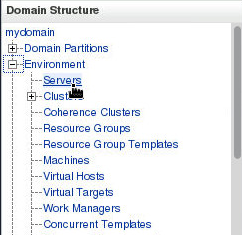
-
- Select server name for which you want to configure Identity and Trust KeyStores
- Go to ‘Configuration‘ and select the ‘keystores‘ tab.
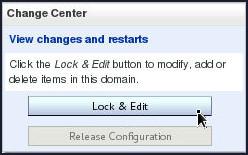
- Under ‘Change Center‘, click the button ‘Lock & Edit‘
- Select ‘Keystores’ from ‘Identity and Trust Locations’.
- Under ‘Identity’ section, select custom identity and Custom Trust
- You need to specify the fully qualified path to ‘custom Identity, Trust KeyStore‘ as well as enter custom Passphrase for Identity and Trust KeyStore on the Keystores page and click on Save button.
- Next, Specify properties of Private key Alias and Passphrase under WebLogic Server Console using SSL section under Configuration Tab.
- Click ‘Save‘
Step 6: Final set-up & Testing Configuration
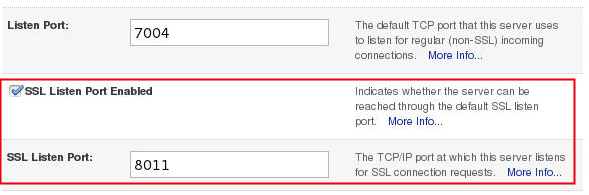
Finally, click on the check box next to the SSL Listen Port Enabled, which is located under the General and Enter the SSL Listen Port as 8011.
Now, Click on the Activate changes button in the ‘Change Center’.
Once the entire process of installation is completed, it is time to restart the Weblogic Admin server using the controls tab.
In order to check whether your SSL is correctly installed or not, you can confirm it with the SSL installation checker.